|
BUILD YOUR OWN BOILER
The boiler should present the largest liquid surface
area possible. Vapor
comes out of the liquid only at the surface, so the more surface area, the greater the opportunity for the vapor to leave.
If you are using a 50 gallon oil drum (I like to find a used vegetable oil drum, as there is no smell of petroleum), use
it in a horizontal support rather than in a vertical position. This way, there is also more area on which to apply the heat,
making a more efficient use of your heat source. For example, with a 200 liter oil drum. If heat is applied to the end of
the drum while it stands vertically, the vaporizing surface would be the diameter of the drum. If the drum were lying on its
side, the heated surface and the vaporizing surface would be considerably greater. The boiler should be vapor and liquid tight
and able to withstand heat and pressure.
The distilling process begins at the boiler and the
plumbing from the boiler
to the still becomes the first stage of the still. If the piping from the boiler is not insulated, much of the water will
condense and run back into the boiler or out through the runoff outlet at the bottom of the column. A slight downward slant
from the boiler to the column will prevent the water from
draining back to the boiler. This simple plumbing trick will
extend the capacity of the still greatly.
REMEMBER: All the still is doing is cleaning the water out of the vapors before
condensing them. The higher the proof we want, the more cleaning we want. As soon as the vapors come out of the boiler, any
slight cooling will strip out a portion of the vapors.
WARNING: Just as a covered pot will boil over
when cooking rice or pasta, this can be a much bigger danger when heating such a big container. The main thing is, never have
a completely closed container. While we don't want an open vent like the little hole on many cook-pot lids, as this would
release lots of precious alcohol, we do want to blow off steam if it gets above 2 or 3 pounds pressure.
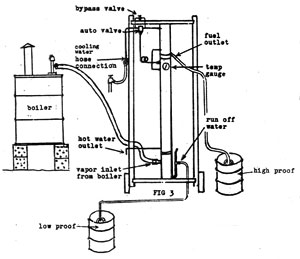
Build your own safety vent:
The cheap and easy way to do this is to put a tin can upside down over a pipe fitting at the highest
point of the barrel, with a 1 kg. rock to hold it down. But you will probably lose a bit of steam, and therefore, precious
alcohol this way. I now prefer to use a 2-inch tee fitting with a 2" swing type check valve screwed into the top of the
tee. I install this on top of the cooker barrel. Screwed into the side of the tee, a a reducer bushing sized to the hose
adaptor fitting which feeds the hot steam down through a 5 foot long black radiator hose to the 3/4 inch fitting at
the bottom of the distillation column. The swing check valve I install on the top side of this 2 inch tee is a brass
swing type check valve (no springs, please) with the direction of flow arrow pointing upwards. It will be normally
closed under the weight of the brass plate, but will open up when pressure exceeds about 2 psi. This gives us a safety relief
valve for our cooker pot, and if the steam pressure gets too high, say above 2 pounds per square inch, this valve will flap
open and closed and relieve the excess pressure before it becomes dangerous. This is safer than buying a steam release
valve which is probably set too high to be safe. In the drawing to the left, you can see the safety valve just above where
the hose comes off the barrel.
DOUBLER
The doubler is the bottom section of the drawing and where the vapors first come
into the still. Here we create a pool of liquid from the stripping above and make the incoming vapors pass through it. This
does several things.
1. The vapor heats the pool. In heating the pool the vapor will be cooled and a considerable amount
of the water will condense. The reason it is called a doubler is because it was found that just about half the water condenses
out every time it passes through one of these pools.
2. The heated pool will be above the boiling point of alcohol so
that any alcohol falling from above will be reheated and go back up.
3. This pool will keep any solids that might
have reached this point in suspension so that they will flow out in the
runoff. This is a very important part of the still,
even
though it isn't difficult to build. In order to keep the pressure that is built up as the vapor passes through the
marbles from forcing the pool out, the pool should be at least seven inches deep. The depth of the pool is set by the trap
made by the runoff line.
MARBLE STRIPPER
Most stills will have a vapour stripper section, which may be plates or marbles.
The Charles 803 Still combines the two types. There is a plate at the bottom and one at the top of this section with many
holes in them. These holes should be at least 3/16 inches in diameter so that the liquid going down will not close the holes
and stop the vapors from going up. They should be small enough that the stripper material does not fall through. The plate
at the bottom supports the stripper material and the top one
distributes the downward flow more evenly.
The first
vapors entering the bottom of the still at the doubler will encounter the cooling pool, condensing some of the alcohol, lowering
the boiling point of the pool. A 5/8" pipe runs through the stripping material from above the vapor inlet to below the stripper
coil inlet to allow some of the vapors to rise and cool quickly and replenish the
pool before the boiling point is lowered
to below the temperature of the incoming vapors, causing the pool to boil out.
You have just learned the principle
behind the big
steam columns.
They supply steam at the bottom of the column and
beer at the top. The plates inside
work just like the marbles and the up and down flow begins. This type of still uses live steam to heat up the stripper, which
also boils the beer. Either by controlling the amount of steam entering or the rate the beer is pumped into the
column
the proof is set. Because heat must be transferred from heat source to water to brew, and because the steam column adds water
vapor which must then be condensed, steam columns are large and not very heat efficient.
CONTROL SECTION
This section simply puts a distance between the top
of the stripper coil
and the condenser to keep the two from affecting each other, and allows us to get some idea of what is happening inside the
still. We need some reference temperature so that we can set the proof of the alcohol coming from the condenser.
The
middle of the control section will give us a reference temperature. Let us stop for a minute and see what this reference temperature
tells us. First, we know that pure alcohol at sea level will boil at 173 degrees F. We dont want the temperature at our reference
point below this or we will be condensing much of the alcohol. In order to distill a high proof alcohol the temperature should
be as low as possible, in terms of being near the 173 degree consation point. The automatic valve will control this
accurately. Exact temperature depends on altitude and a variety of other factors. The flow of water in the condenser coil
needs to be no greater than sufficient to cool the liquid to 100 degrees F. This flow will be determined by the amount of
vapor to be condensed and the amount of water in those vapors, which is determined by the temperature of the vapor going in.
The flow of water through the stripper will be determined by the proof we want. The more vapor going through the still, the
more water needs to flow through the stripper to keep the temperature of this section constant. The cooling water for the
reflux section has already been somewhat pre-warmed by its short journey through the condenser. This water is already
warmed somewhat, so it is less likely to overstrip or condense alcohol vapor. This coolant water enters at the top and
comes out the bottom of the stripper (reflux) coils. The water coming out the bottom 1/4 inch tubing at the bottm
of the still will be at very high temperatures. It can be used as a heat source for the distilling room, another room
or part of the alcohol production process.
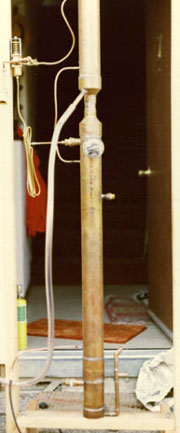
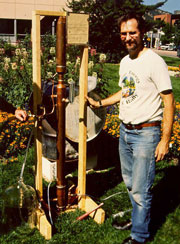
THE MODEL 803 STILL IN OPERATION.
With a thermometer
in the liquid area of the boiler, we can watch the temperature rise in the boiler. At some temperature above 173 degrees F,
the pipe between the boiler and the stil1 will begin to heat up. The exact temperature at which this happens will depend on
the concentration of alcohol in the brew. A low boiling point indicates a high concentration of alcohol. You can follow the
vapors by feeling the pipe and still as they warm up.
Remember - The steam starts at the boiler, enters
the bottom of the distillation column, and then vapors are being cleaned (the water is removed) as the steam travels
upwards.
Soon after the mash starts to boil, the temperature in the control section will start to rise. When this occurs,
start a cooling flow of water. If you are controlling the water flow manually, let the temperature rise to around 190 degrees
F and hold it there for a couple minutes to start with. You will start to see your first pure alcohol coming out the
high proof spout at this point, and this moment is always a very exciting one! But you don't want the condensing section to
get too hot, so start your water flowing at the manual bypass valve, if you don't have your automatic valve adjusted to the
right temperature, yet. You should adjust your valve only a small amount, say 1/8th to 1/4 of a turn at a time,
and watch the dial thermometer to see how the temperature respnds. The less vapor flowing through the still,
the smaller the change and the slower the reaction will be. But on the other hand, if your mash is boiling full blast,
you have to get the cooling water going almost full blast (through the 1/4 inch internal cooling coils) to strip
the water out of the hot steam. Be sure you allow time for the change to take place and the proof to level off.
If you have a hydrometer, draw off and save small samples of your high proof alcohol, occasionally into
an empty beer bottle, and record the proof and temperature at each test so you can go to that temperature for that proof.
If you have an automatic valve, turn it to the lowest
temperature setting. When the control section temperature
stabilizes, slowly turn the valve to a higher temperature until alcohol begins coming out. Let the still stabilize here
and check the proof, raise the temperature slightly, stabilize and check the proof and so on until you reach the highest temperature
your valve will allow, or the lowest proof you wish to distill. Once you are familiar with the valve, you may set it quickly
to get whatever proof
you like and it will consistently get that proof.
Dont be surprised if the alcohol starts coming
out
before you turn the water on. The vapors will condense on the condenser coils as they warm the condenser.
REMEMBER:
You are not applying heat in the still. The
control temperature is the result of vapor flow. If you dont have any
vapor flow, the temperature will not be very high. The more alcohol in the beer, the sooner the vapor begins to flow. If nothing
but water ever comes out of the still, there was no alcohol in the brew. Soon after you start distilling, there will be some
flow out of the runoff outlet. This will mean that the pool is full
and the still is nearly stabilized. Once the pool
is full and you have adjusted the temperature to the proof you want, alcohol flow will increase. The up and down flow is established
and the pool is flashing the alcohol that reached it back up to the stripper. As long as the heat is being applied to the
boiler at an even rate, the vapor is
removing all the heat that is being put in.
REMEMBER: The brew is losing alcohol.
The smaller the
batch or the more heat being applied, the faster this happens.
As the alcohol percentage falls, the
temperature in
the boiler will begin to rise. This is because the boiling point of the mixture is approaching that of
water. The rise in temperature will be seen in the still also, so little by little more water will have to be sent through
the stripper to hold that temperature steady.
Watch the boiler temperature closely and record these
temperatures and
the length of time it takes this rise to occur.
The operation of this still is such that the heaviest
flow will be
at the beginning and slowly taper off until the alcohol flow stops altogether. Check the proof as it gets near the end.
If
it begins to fall off increase the stripper water. You will notice more and more flow out of the runoff. When the alcohol
all but stops, check the boiler temperature. This will be the temperature at which your still
will have most of the alcohol
out of the brew. This
is when the heat should be shut off. If the amount of alcohol coming out of the still could not
keep the fire going you are putting more energy into the operation than you are getting out.
The liquid left in the boiler
contains the acid you
added earlier to lower the pH of your brew. This water may be cooled, the solids settled out and
fed to hogs, poultry or fish and the remaining liquid put in the fermentation vat as the second half of the water to cool
the brew before adding the second enzyme.
RUNOFF
There will always be some alcohol in the runoff.
Although the
quantity may be slight it is a good idea to rerun the runoff. It is much cleaner than the original brew and will clean out
your boiler and the plumbing on the way to the columns.
CORRECTION AND ADJUSTMENTS
The first thing to be taken care
of is any liquid or
vapor leaks from the still. Vapor loss means loss of alcohol. This can be checked before operation
by sealing off all but one opening in the still. Blow air into that opening. Any air leak would be a potential vapor leak.
Seal these up.
If little or no alcohol came out and the temperature
in the boiler slowly rose to the boiling point
of water (212 degrees F) the problem is probably not with the system, but with the fermenting. Be sure you check the runoff.
There may not have been enough heat to get the alcohol to the top of the still. With too small a heat supply this could happen.
The still is designed the size it is so that you can use heat sources that are normally found on the farm to power it. It
can be run at minimum capacity from the burner of a gas or electric stove. This will produce 6,000 to 10,000 BTU/hour of heat.
The same problem could be caused by too great a heat
loss. If you are operating the boiler outside in the winter just
a little wind could cause too great a heat loss and all the alcohol could be in the runoff at a fairly high proof or could
have run back into the boiler The boiler and still should both be inside a building.
TOO HIGH AN OPERATING TEMPERATURE
If, the control temperature is much above 173 degrees F when the proof of the product has peaked out (should be above
190 proof), we should make some corrections. This is caused by too much back-pressure in the boiler. Unless your pool is very
deep, this would be the last thing to change. Within reason, the deeper the pool the lower the proof of the runoff. Too great
a distance between the boiler and the still with too small a pipe is the most likely cause of the problem. The easiest way
to maintain the low pressure required (5 lb.) and at the same time provide a blowoff valve for your boiler is to come out
of the boiler with a large pipe. This pipe should be 1-1/2 to 3 inches depending on the size of the boiler. Run this pipe
up and out the top of the building. Put a metal plate with a rubber ring under it on top of the pipe. Weight this cap until
it weighs five pounds. A tractor exhaust rain cap with a rubber
seal will work nicely. This provides a pressure release
at a safe distance from workers and visitors who seem to inevitably gather around a still, and also provides some stripping
action. The line to the still can be tapped off this pipe and will pick up vapors with a higher concentration of alcohol higher
up the pipe.
Even inside the boiler condensation is taking place.
Any piping to the still becomes a part of the distilling
process.
What this still is, then, is a controllable cleanup mechanism. This is why we say dont underestimate the amount
it can distill. It is also why we cannot say what the hourly capacity will be until the entire system is built. The more stripping
that is done before the vapors get to the still the less work the still has to do. Once we get the still to produce the proof
we want the capacity can easily be increased by working with the system ahead
of it. For example, we could take the water
from the stripper coils and run it through coils wrapped around the big pressure release pipe between the boiler and line
to the still. This water has been heated in the stripper coils to only slightly below the temperature of the vapors leaving
the boiler. It would absorb a tiny bit more heat causing stripping to take place in the vertical pipe but not condensing all
the vapors or cooling them to the point that the still would not work.
REMEMBER: What you want is a slowly decreasing
temperature from the boiler to the condenser of the still. This is the key to the whole system. As long as you do not shock
the vapor with too sudden a temperature change, the water vapor will gradually fall out, Any alcohol that may condense along
with the water will have a chance to re-vaporize as it runs back to the warmer part of the still. If you understand all of
the principles, you should now be able to build a distilling system with a capacity of many gallons per hour. "Start out small
and grow as you get the feel of what is happening."
|